





Like many a nerd, I have a certain fascination with locks. This enduring interest originates in reading the memoir Surely You’re Joking, Mr. Feynman as a teenager, in which Nobel laureate Richard Feynman famously recounts picking locks and cracking combinations while working his day job on the Manhattan Project at Los Alamos. Today, I maintain a modest collection of locksport pick sets and training locks that I have accumulated at various hacker conferences over the years—even if I remain genuinely terrible at actually picking them. I also find endless delight in the YouTube exploits of security practitioners like the LockPickingLawyer, whose methodical dismantling of commercial hardware has captivated millions.
All of this left me wondering if I might try my hand at building an interesting, unconventional lock of my own. One clever strategy that lockmakers have long used to challenge would-be plunderers is simply to conceal the existence of the lock itself, rendering brute-force or traditional physical attacks vastly more difficult because an intruder cannot target what they cannot find. A modern variant of this concept is the magnetic lock, wherein a permanent magnet is held or slid against an innocuous portion of a door, panel, or box to trip an internal catch and release the mechanism. The inherent flaw with this approach, however, is that once an adversary guesses the general location of the concealed lock, any sufficiently strong magnet will easily open it.
Faced with this security limitation, I initially began thinking about embedding an RFID reader just beneath the surface of a box, though I quickly resigned myself to the administrative annoyance of having to keep track of yet another electronic access card. But then I stumbled across something much more intriguing: SparkFun’s US $100 magnetic imaging tile. As I examined the specifications, I realized I could use this advanced component to build a sophisticated magnetic lock that opens not to a static magnetic field, but to a programmable, highly specific secret gesture.
The magnetic imaging tile is a small-run SparkFun board based heavily on open hardware work originally developed by Peter Jansen. It features a dense 8-by-8 grid of Hall-effect sensors, and it communicates using a standard Serial Peripheral Interface (SPI) connection to talk to whichever microcontroller the builder happens to choose. These individual sensors are capable of detecting both the magnitude and the polarity of an external magnetic field. Crucially, the board can report its comprehensive measurements anywhere from hundreds to thousands of times per second, depending on the processing power available on the host microcontroller. This sampling rate is more than fast enough to capture the fluid motion of a magnet being drawn by hand across the board’s sensor area—forming the basis of my secret unlocking gesture.
An especially appealing characteristic of relying on magnetic fields rather than traditional radio frequencies is that, if I were ever inclined to enter an extreme state of paranoia, I could shield the entire locking assembly behind a continuous layer of copper sheeting. This is something I simply could not accomplish with an RFID reader, because a metal enclosure would disrupt the radio waves necessary for operation. In this scenario, the copper sheet would function as an effective Faraday cage, blocking any stray RFID signals alongside any other electromagnetic fields that an attacker equipped with an EMF meter might otherwise use to locate the hidden lock underneath the surface.

Choosing the Brains of the Box
To process the incoming sensor data and drive the physical hardware, I selected a Teensy 4.1 as my primary microcontroller. I am particularly fond of the Teensy platform because it offers an abundance of input and output pins, a blazing-fast 600-megahertz processor, a full megabyte of RAM, and a built-in SD card slot, all packed into a remarkably slim form factor with an equally accessible $32 price tag.
Wiring the Teensy to the magnetic-imaging tile proved to be a straightforward task, complicated only by a minor production oversight: one side of the sensor board features a silk-screen error that incorrectly identifies the precise SPI connections. Fortunately, SparkFun has noted that this labeling mistake will be corrected in future manufacturing runs of the component, and careful reference to the pinout schematics easily resolved the confusion.
When it came time to write the gesture-recognition software, I once again found myself grappling with the evolving role of AI-assisted development tools, often referred to as vibe coding. If you read my Hands On piece examining the creation of a teletext suite for amateur radio, you will already know that I have been deeply pondering how vibe coding should be responsibly integrated into DIY electronics projects, if at all. For this project, rather than allowing the AI assistant to write the entire software stack from scratch, I deliberately confined its role to writing just two specific support libraries, which are available for review in our online repository.
One of these libraries takes direct charge of recording a specific locking gesture and saving the resulting coordinate data securely to the Teensy’s nonvolatile storage. The second library continuously monitors the tile during normal operation and reports whether or not a newly detected gesture crosses a selectable mathematical threshold to be considered a valid match.
I wrote the top-level control code entirely by myself to keep the project as genuinely DIY and transparent as possible. This custom top-level code manages essential hardware interactions, such as a physical button that puts the system into gesture-recording mode only after a brief safety delay, an indicator LED that visually signals when the box is actively recording, and the logic that operates the physical locking mechanism itself.

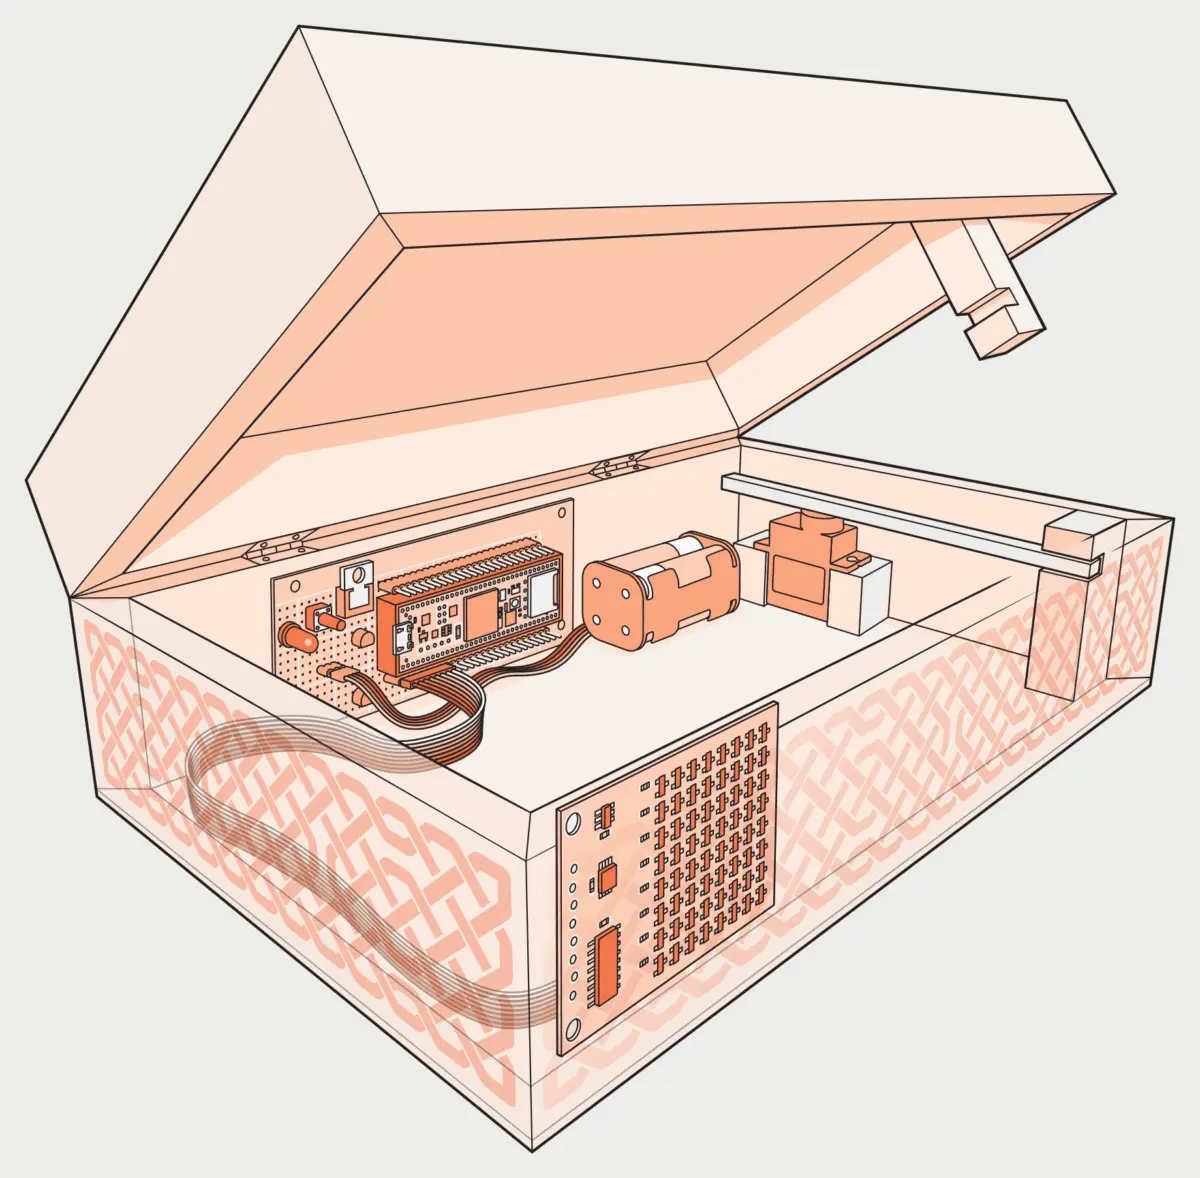
To properly demonstrate this proof of concept, I naturally needed an enclosure to lock. I purchased an off-the-shelf wooden craft box from a retail art supplier and carefully removed its existing factory-installed metal lid latch. I then glued a notched wooden beam securely inside the lid and engineered an internal mechanism that uses a small servo motor to rotate another wooden beam cleanly in and out of this structural notch. I will be the first to admit that this mechanical linkage goes somewhat beyond "simple" and ventures firmly into "simplistic," but it is robust enough to reliably secure the enclosure for demonstration purposes. The box itself provides ample internal volume to mount the magnetic imaging tile flat against one interior wall, alongside the Teensy, the battery pack, the recording button, and a small auxiliary board populated with two NPN transistors. These transistors serve the vital function of converting the Teensy’s native 3.3-volt control signals up to the steady 5-volt level required to properly drive the servo motor.
Once all the components were assembled and tested inside the wooden enclosure, I quickly discovered a practical design hurdle: the small physical size of the magnetic tile’s active sensing area—measuring a mere 3 centimeters square—made it easy to conceal the tile entirely inside the box, but remarkably difficult to perform the unlock gesture on the exterior surface in a way that the internal sensors could read consistently. Simply marking the physical outline of the sensor area on the outside of the box would have completely defeated the primary security objective of having a hidden lock in the first place.
Drawing inspiration from my own cultural background, I decided to mine my Irish heritage for a clever camouflage solution. I designed an intricate Celtic knotwork pattern that runs in a continuous, decorative band across the front panel of the lockbox, utilizing an online knotwork generator before projecting and tracing the pattern directly onto the wood. By using the interwoven lines of the pattern as a disguised reference grid, I am able to guide my hand and execute a repeatable, precise gesture entirely within the hidden confines of the internal sensor area. To physically execute these gestures on the exterior wood surface without leaving marks, I use a small magnetic stylus borrowed from a historic ferrite core-memory kit that we previously featured in our archives.
Naturally, there is obvious room for architectural improvement in any future, more serious installation of this concept. The single biggest drawback to the current design is that if the box happens to be locked when its internal battery eventually runs flat, there is no electronic way to open it again without resorting to physical force. This vulnerability could easily be resolved in a subsequent iteration by integrating a hidden inductive charging coil to power the system externally from across the wooden barrier. Nonetheless, the current demonstration lockbox functions exceptionally well in practice—meaning I now just have to carefully consider what valuable secrets I should actually store inside it.